
Kitchen layouts – everything you need to know
The right design will create an efficient space that’s safe and comfortable for all the family
They may be built for cooking, but today’s kitchens are often designed with so much more in mind. Depending on the size of your room, you might want to combine cooking and prep areas with dining and living zones all in one open-plan space. That’s why it’s so crucial to get to know the most common kitchen layouts and pick the right one for your space.
Many people these days want a family hub where everyone can come together for meals, but still have room to do their own thing – be that unwind on the sofa, catch up with TV, browse the internet or fit in some homework. Even if you don’t have masses of space, having somewhere in the kitchen to enjoy a glass of wine or supper with friends will allow you to be part of the conversation while preparing the meal.
When it comes to the functional part of the room, a good layout will make the most of the available space and keep everything well organised, with the most regularly used items to hand. But it’s not all about storage. Flow is an important consideration. Especially in an open-plan space or where there are several doorways or an island to work around.
Using the layout to steer traffic away from dangerous hotspots and towards user-friendly areas instead, such as a drinks fridge or seating area, will ensure that your kitchen is a practical, safe and sociable space for all its users, including guests and children.
1. How to plan a kitchen layout

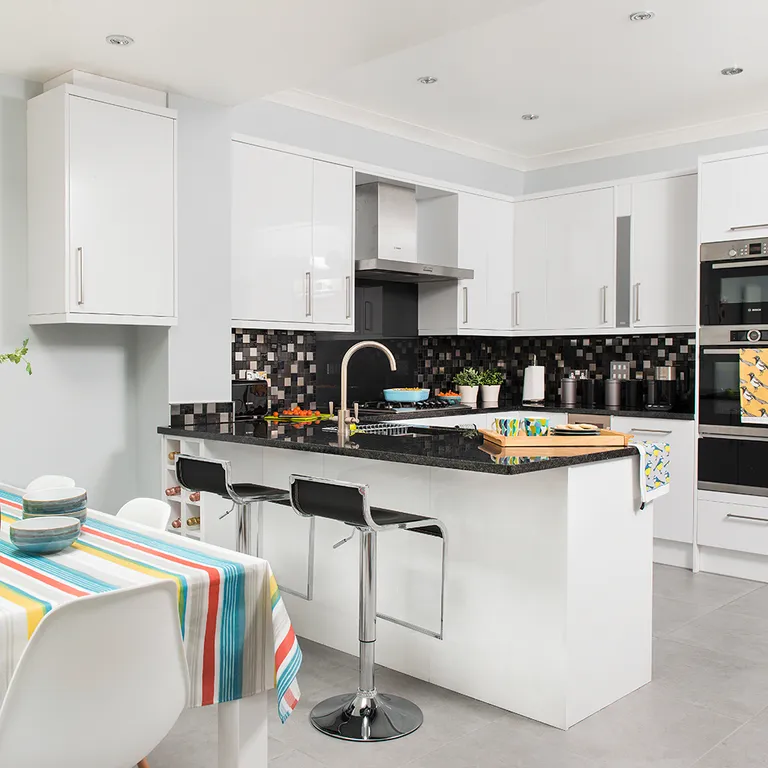
Image credit: Alison Hammond
In most cases, the size and shape of your room will determine the most suitable design, and it’s always helpful to consider the classic ‘working triangle’. This concept is designed to minimise effort and walking distance between the sink, fridge and cooker by placing them on three points of a triangle.
This approach works with most kitchen layouts, although, if you have to run all the appliances and the sink along one wall, you may need to ‘flatten’ the triangle. To do this, position the three points in a line with just a few steps to walk in between.
However, nothing is set in stone. ‘If the triangle works in your kitchen that’s great, but don’t feel you have to be a slave to it,’ says kitchen designer Mark Wilkinson. ‘If you have to walk a few extra steps, it will be worth it if it means you’re able to include an extra element you really like that wouldn’t otherwise fit into the design.’
2. Are there any alternatives to the working triangle?

Like Mark Wilkinson, there are several other designers who feel that the triangle can be too rigid and who prefer to think of the kitchen in terms of zones. ‘Blum’s Dynamic Space’ concept is based on arranging your layout as task zones designed in a clockwise (or anti-clockwise) route.
Tasks might include emptying the dishwasher (store your crockery close by), making breakfast (keep all your breakfast things together), preparing meals (utensils, chopping boards and bins in pull-outs under the worktop), cooking (store pots, pans and utensils in a drawer under the cook top with bottles of oil and spices in a pull-out close by), and cleaning (materials for cleaning close to the sink).
With everything close to hand, you can then create the most convenient workflow.
3. How do I control the flow of people in a kitchen?
The workspace may be crucial, but the movement of people around the kitchen space as a whole also needs careful thought. The main aims are to keep children away from danger spots and stop guests from getting in your way. Look at placing the fridge at the threshold so children can access drinks and snacks without straying into your path. In open-plan spaces, make sure the route through from the entrance to the garden is unobstructed and think about how best to direct your guests to seating areas.
An island can act as a useful shield for the cook – position bar stools along the opposite side to give guests a place to perch at a safe distance. ‘in a large space, consider using two islands to create multiple-flow possibilities,’ says Graham Barnard, MD of Matrix Kitchens.
Try changing decor to demarcate the separate dining, lounging, cooking and office areas in a multifunctional space. ‘This can be achieved by using different floor finishes, paint colours and lighting in each of the zones,’ says Robert Burnett, head of design at Holloways of Ludlow.
‘Don’t forget, you can always strategically position a wall, or include a room divider such as a half-height wall or storage unit, to help screen off certain areas,’ advises Scott Nicholson, MD of Chamber Furniture. ‘It does need to be carefully placed so as not to block out light, but we are using these features very successfully in an increasing number of our designs.’
4. My kitchen isn’t a standard shape – what do I do?

Not all kitchens are standard cubes or rectangles. Some are glass boxes with limited wall space, others have sloping ceilings, while you may also have tricky features to work around such as pillars or numerous entrance doors. An experienced kitchen designer will have come across all these sorts of problems before, so do ask them for advice.
‘Often, it’s not possible to get rid of structural pillars,’ says Scott Nicholson, ‘but sometimes you can move them, and even shifting by half a metre can have a huge impact in some rooms. You can usually convert something negative into a positive feature if you deal with it imaginatively – try building a pillar into an island to create an architectural feature, for example.’
L-shaped and t-shaped rooms can be effectively split into zones, dedicating one leg to dining or storage, and keeping the working kitchen in the other.
If you buy a property with curved walls, such as an oast house, it’s usually because you like its style – ‘so make the most of its quirkiness with cabinets that follow the curves,’ Scott advises. Even if this means that you have to buy more expensive bespoke furniture, you may not need a large amount of it to create a dramatic effect.
5. Choose the best kitchen layout for you
Galley kitchen layout
What is it? Named after the diminutive ship’s kitchen, the classic galley has one single row of units, while the double galley has two, running parallel.
Galley kitchen floor plan
Why choose it? It’s the ideal layout for narrow rooms, but is also a popular option in open-plan spaces where a long island runs parallel to the units along one wall. Though it’s traditionally long and narrow, it can be exceptionally functional if planned correctly.
Design tips Try to separate the cooking zone from the wet area with a length of worktop in between – the worktop in total should be at least three metres long.
Aim for at least 1.2m between facing doors and include an efficient triangular cooking zone with the fridge on one wall and the sink and hob opposite (or a variation on this theme). if space allows, it’s best to avoid having tall units which might accentuate the narrow space. For the same reason, stick to paler colours to help keep the room light and airy.
Be careful not to install too many wall cupboards, as it may make your kitchen feel cluttered.
U-shaped kitchen layout
What is it? A common solution for medium-sized rooms is to run the units round three walls in a U shape.
U-shaped kitchen floor plan
Why choose it? It’s extremely practical, as you can have the cooker and hob at the centre, with sink and fridge at either end of the U to create the perfect working triangle. This layout also provides plenty of workspace, and you can use clever internal fittings to get the most out of the corner cupboards.
Design tips With such a large worktop area, a well-chosen surface can really come into its own, so pick something striking. Consider solid-surface materials such as Corian, which can sweep around corners seamlessly.
If the room is particularly compact, try to have at least two metres of space in the centre. Small rooms would also benefit from reduced-depth units and worktops, so ask your supplier if this is an option.
In a larger room, you might have enough space for an island or a table and chairs at the centre of the U. Or, in a classic kitchen-diner, the third leg of your u-shape could be a peninsula – a long island joined at one end to the wall, between kitchen and dining areas.
If your room is open-plan and you spend a lot of time entertaining, you may want to think about having the bulk of your kitchen designed as a u-shaped island, which can then become a real cook’s theatre. Or create a G-shape, with a peninsula joined to one of the walls.
L-shaped kitchen layout
What is it? A truly versatile design, the L-shaped kitchen comprises two runs of cabinets at right angles along adjacent walls.
L-shaped kitchen floor plan
Why choose it? Here you can create the ultimate working triangle with the fridge at one end of the L, the hob on the other and the sink in between. This layout feels open, but can be more tricky to work with.
Design tips Make sure there’s enough space in between each zone and consider installing a bank of built-in appliances on one side for ease of use and a streamlined effect.
The best ergonomic placing has the hob on one wall, and the sink and fridge on the other, but do make sure there is adequate workspace between these elements. this can be an efficient layout for one cook, but two may find themselves under one another’s feet – you could include an extra prep sink to ease the pressure.
If space allows, you could also place a small dining table at the side.
Island kitchen layout
What is it? Probably the most popular kitchen element of recent years, an island sits in the centre of a room, with worktops on the surrounding walls.
Island kitchen floor plan
Why choose it? If the space is large enough, an island unit provides a multifunctional space that can work as somewhere to cook, prep, eat and entertain. It can act as a ‘bridge’, cutting down on leg work between workstations, and, in a large room, it makes the most of unused space.
Design tips Consider incorporating a hob and sink as well as a dishwasher, wine cooler and recycling bin. There should be plenty of room left over for decent storage, too. Make sure there’s at least one metre between the island and all the cabinetry surrounding it, so that you can open all doors and drawers.
Add a worktop overhang to create a breakfast bar seating area, or a stepped-down surface for an informal dining table.
To make the design more functional, position ‘working’ elements along one side of your island so you don’t waste time constantly walking around it. ‘Most people allow 900mm between a wall run of cabinets and an island,’ says Nicholas Goldman, MD at Goldman & Rankin. ‘However, it should really be 1,100mm minimum to create a spacious feel, especially if you have more than one cook in the kitchen, so you can move past each other with ease.’